Friday, September 16, 2011

TuTu Cute


I FINALLY got to do it! A tutu mobile!

My BFF and I had planned a craft day. She loved the mobile and 'L' I had made for baby Logan's rooms, and her hubby had requested all of the rest of the letters (the 'ogan' part) to hang above the closet in the nursery. Since the L I made was 12"x12", what I had on hand wouldn't quite work, so we planned to shop it up at Michael's and make a whole craft day of it. The plan was the figure out letters for above the closet, make a fabric book shelf/pocket type thing (BFF recently joined Pintrest and this was her first planned Pintrest project), and since her neighbor had a baby girl about a month ago, I thought this would be the perfect time to try out my TuTu mobile!

We ended up shopping for FOUR HOURS for our projects. JoAnn Fabric and Lowes were our first stops to buy things for the book pocket (a project we never even got to, so that may possibly be another post). Then we went to Michaels where the majority of our time was spent. We had NO IDEA what we were going to get for the letters or the tutu mobile. After fumbling around for different letter options, we ended up with wooden letters about 3"-4" tall, and thin thin canvases about 6"x4". The letters were white so we figured we would paint the canvases then hot glue the letters on top. We grabbed more craft paint in case what I had left from the airplane mobile wasn't enough, and that project was settled.

We spent much more time trying to figure out what to hand off of the tutu mobile. I knew the basics and grabbed a wire wreath form and two spools of pink and white tulle from the wedding section (I knew I needed three spools of ribbon to cover two wire rows on the airplane mobile, so I compared the length of the ribbon to the tulle, and since the tulle was much longer I figured two of those would take care of it). After wandering through the baby and wedding aisles, fake flowers, jewlery, and scrapbooking, we decided on hanging a combination of paper flowers (green because the nursery is pink and lime green) and crystal beads (pink and clear).

The process for the tutu mobile was pretty much the same as the airplane mobile (seen here). I first painted the green wreath form white, then I unrolled each spool of tulle and kept cutting it in half until I had pieces that looked like a good size. Originally I was going to alternate pink and white, but when I pulled the first few pieces up, it looked like I had cut the white ones shorter than the pink, so I decided to do the outside row in white, and the second row in pink (turns out it was just the pieces I picked up, so I could have alternated, but it looks this way too). I'm not sure if I explaned how I did the ribbon in on the airplane mobile, but basically I folded the ribbon/tulle in half, stuck the loop part inside the row I was working on, and pulled the ends through the loop, so the wire was in the middle. I had to hot glue the ribbon in place, but the tulle held on to itself quite well.


As for the hanging part, it was all trial and error. Do something, show BFF, adjust. Every flower had a bead under it to keep it on the line. Some had one or two above/below it, and there were also some beads that were on their own on the line. I have to say, it took me a long time to complete three rows (including hot gluing a dot above and below each bead to be double sure they wouldn't fall off and end up in baby's mouth... eek that would NOT be good). So I passed the job along to the BFF and she found a MUCH better, and faster, way to hold the beads in place by threading the string through the bead, then looping back around and threading it through again (then we'd still hot glue dot it just to be sure!)- I had previously been tying multiple knots on top of each other, till it was big enough to hold the bead. She also came up with more creative ways of alternating bead and flowers. So six strings later and together we eyeballed where they would hang, and how long they would hang (though we did some of this as we were putting them together, so we didn't end up with the all the flowers and beads at the same lengths).

Here's a closer look at the flowers and beads, and the variance in how each was hung:


\


To finish off, we hung the strings at the top, and I pulled every other pink piece of tulle from the second row, through the white on the first row to give more color variance, and voila:


I even took a picture to see how it would look to the baby... very pretty!


I was not there when baby's mom came and saw it, but I heard she loved it, and was so surprised that we had made it for her. I have seen her since though, and she is still looking for a place to hang it, but cannot wait to get it up in the nursery.

As for a price breakdown, I unfortunatly forgot to keep the reciept, but my only purchases for this mobile was the two spools of tulle, the wreath form, a box of paper flowers, and two colors of beads (two strings on each). I believe my total came out to be around $25, and the only reason for the higher expense than the airplanes, is that the flowers were $7 for the box, and the beads were around $6 for both. Much more expensive then popsicle sticks and clothespins, though I ddin't have to buy any paint for this one. I do have a string of each color beads left, and about 1/4 of the box of flowers, so I could use those for another mobile (and during this I inadvertantly discovered how to make a palm tree out of the beads and green flowers, and one of my other mommy-to-be friends has palm trees in her nursery bedding, hmm...)

Monday, September 5, 2011

Playing Art Class

This long weekend was my time to pull out that pack of canvases I bought on sale at Michael's and just play. Most of my ideas have come from Pintrest (surprise, surprise!), combined with some methods my dad uses when he paints. I wanted to make some art for our bedroom, and maybe just use stuff I had and see what I can come up with.

I wanted a gray and yellow scheme for the bedroom, so we painted the walls gray and the plan would typically be to use yellow accents and decor, BUT we have a lovely walk in closet and I thought, wouldn't it be fun to paint the closet yellow. While we were at Lowes I found a gallon of BRIGHT yellow on the mess up shelf for $5... I figure not many people are going to see it, so if it looks goofy, who cares. We had tons of the paint left over (gray and yellow) so I filled tiny Tupperware with both colors to use for my art. And I also have the tan, blue, and green paint left over from the mobile project for baby Logan's nursery.

Attempt on canvas #1 was based on the chevron patterns that are ALL OVER Pintrest. There's so many that there isn't even a picture to share with you. Initially the plan was yellow chevron pattern on the while canvas. So with my ocd I started with the canvas, and pencil, and a ruler. I measured how many rows I wanted vertically, based mostly on the length of the canvas so it would end up even, and drew lines with the ruler. Then I measured across and marked where I wanted the tops and bottoms of my points to be and made marks everywhere on the canvas. By the end, it looked like this:


Then I took what I've seen my dad do a MILLION times when he does his artwork, I cut up masking tape and started filling in the lines.


then filled in the lines with yellow


I took care of a second coat then used a trick I stole from Young House Love (.com of course!) and pulled the tape off before it was completely dry to help keep smooth edges. While the lines looked great, I could NOT get rid of the pencil lines no matter how hard I erased... uuuggghhhh! So it turned from yellow and white, to yellow and gray. Normally I would have painted the whole thing yellow first, THEN taped and painted gray over top, but this meant that I had to RE-tape over the yellow and fill in the lines with gray.


After meticulously lining tape up with the edges of the yellow, painting, and pulling the tape up, I ended up with my first piece of artwork for the bedroom- TAADAAAA


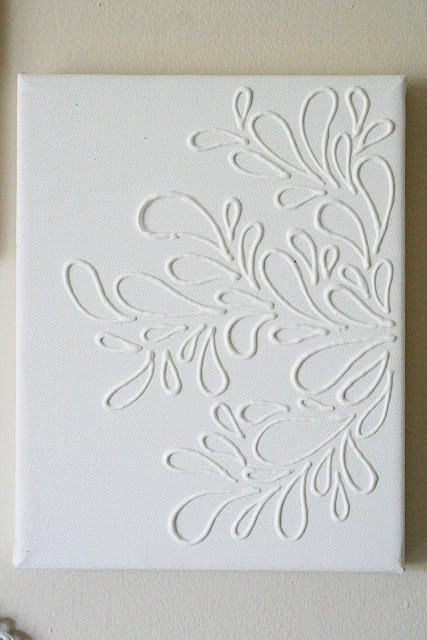
Attempt #2 was based on pictures like this found on Pintrest


patern tutorialoriginally from here, love hearts available for purchase here


What I've read was to use wooden letters or puffy paint. I didn't feel like going to the craft store and figured I could get the same look from Elmer's glue, which I could just pick up at the Walgreens. It started out pretty good- customized with our initials and our wedding date

What I found is that Elmer's glue does a FABULOUS job for what it's supposed to do, it dries pretty flat. Good for gluing paper, sucky for trying to make canvas artwork. So after it dried I applied a second coat of glue, and when that dried, a third. And when that dried, it finally looked raised enough to paint on and show up.


Then I painted the whooooole thing. I thought yellow might be too much for the whole canvas to be, so gray it was


I know the picture doesn't do it much justice. There isn't enough contrast to pick up with my plain 'ole camera, though that's kind of the point of the whole painting. It looks alright, but my three layers of glue gave it some wavey lines and weird places where it's half raised/half flat. If I did it again I would use puffy paint the first time (and/or try the method that the first Pintrest photo actually explains... check out her blog for more info), and work on a steadier hand. I don't know that I'll end up even putting this one up, but I'm glad I tried it and messed up so I know what to do better next time.


Attempt #3 was my BEST YET! Another gift for the baby Logan nursery... mostly because I already have the colors and little 'L' has an initial I can make out of tape. And tape I did! First I eyeballed and made and L out of my masking tape. Then painted over the whole thing in tan


Once that was dry, I eyeballed where I wanted lines of one color (I ended up doing blue first). I knew I didn't want even lines- distance between lines, size of lines- so when I say I eyeballed, that is exactly what I did. I took pieces of tape and taped them across the canvas, and painted between some of the pieces. Two coats of blue went on, pulled the tape up (careful not to pull the L up with it) then when that was dry, I eyeballed more lines, and put on two coats of green. Here's a picture of me in the process of painting the green lines


You can see some of the blue lines poking through, but most of them were covered with the tape for the green lines.


I pulled the tape up, again watching the L, and waiting till that was completely dry. Once the whole thing was set, I pulled up the L I was left with this little gem


There's some things I don't really like about it, some unclean lines, and I think the little nub at the top of the L looks a little funny when everything else is so thick. But generally speaking, for eyeballing everything and just trying stuff out, I'm REALLY REALLY happy with it. I sent a picture of it to Logan's mommy and she said she loved it... we'll see if it actually ends up on a wall :-)

Not much need for a price break down but I can tell you that I got 7 12x12 canvases on sale for about $13 at Michael's (and if I had thought about it, I probably could have found a 20% off coupon). All the paint I already owned, AND since I used my wall paint, I'm sure my art will actually match my room now!


Woohoo... cheap art!